Useful Corner
INSPECTION PROCESS
The inspection process is normally from Preparation -> Orientation meeting -> Sampling -> First piece control -> Full control -> Closing meeting -> Final report, details as below:
Preparation: review inspection protocols, WI & client’s specification, determine the traveling routes, bring necessary tools and client’s samples if available
Orientation meeting: introduce him/herself, explain KFQ anti-bribery policy, confirm the products to be inspected, ask for the cooperation from factory, request necessary equipment and inspection places
Sampling: observe the storage conditions, count the quantity, calculate the sample size for each item, draw the cartons randomly, monitor the transportation of selected cartons.
First piece control: record the selected carton numbers, check the shipping marks, verify against client provided specification, compare to the approval sample, identify the first piece sample and approval sample if available, start the endurance test
Full control: do the workmanship check, safety test, function test and other on-site tests, identify and isolate the defects found, check the defects with the factory representative, prepare the draft report
Closing meeting: explain inspection findings, clarify any questions, ask the factory to check and sign the draft report
Final report: remark all nonconformities and conformities, insert supporting photos, draw conclusion of each section and overall result, send the report to office
SAMPLING PLAN & AQL
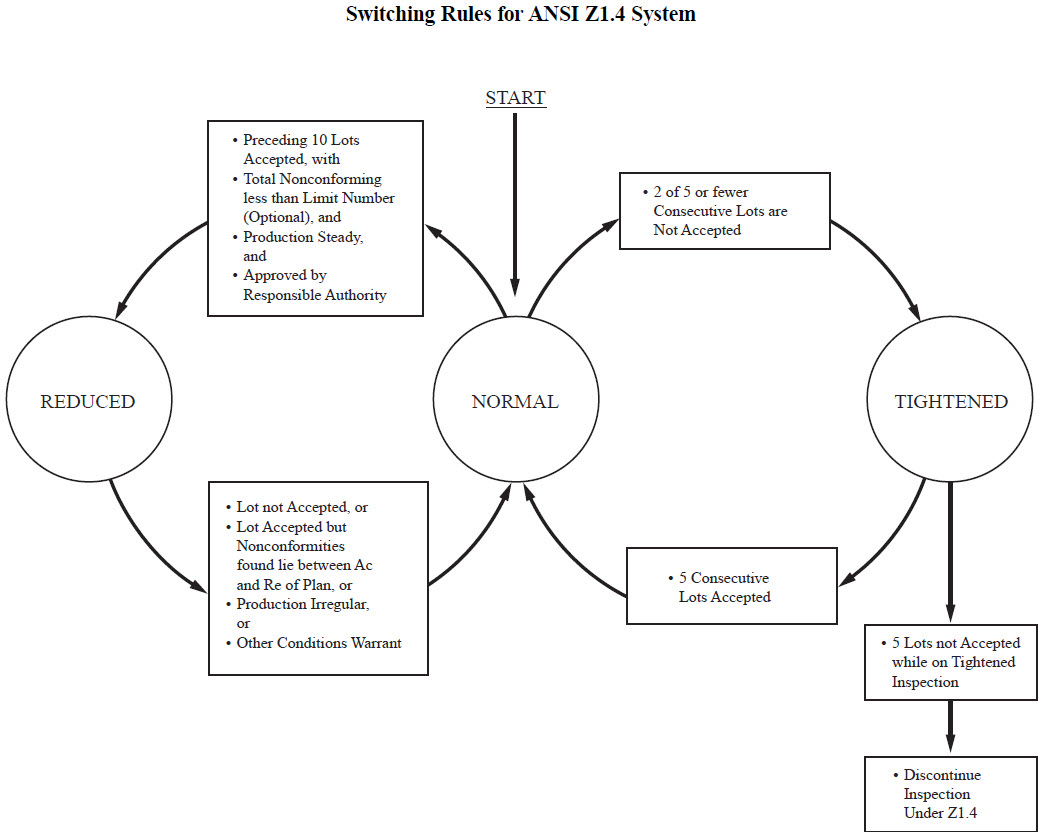
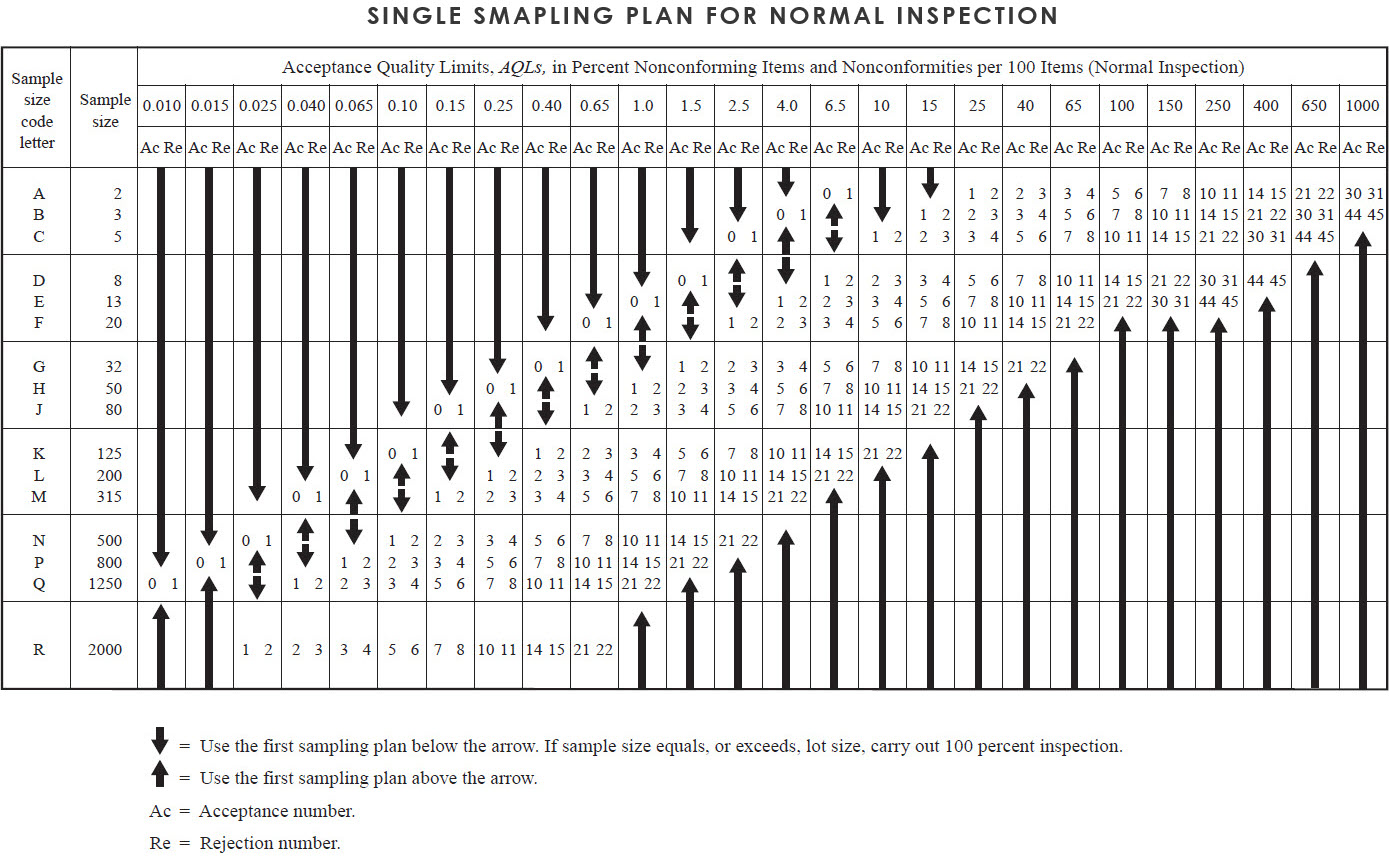
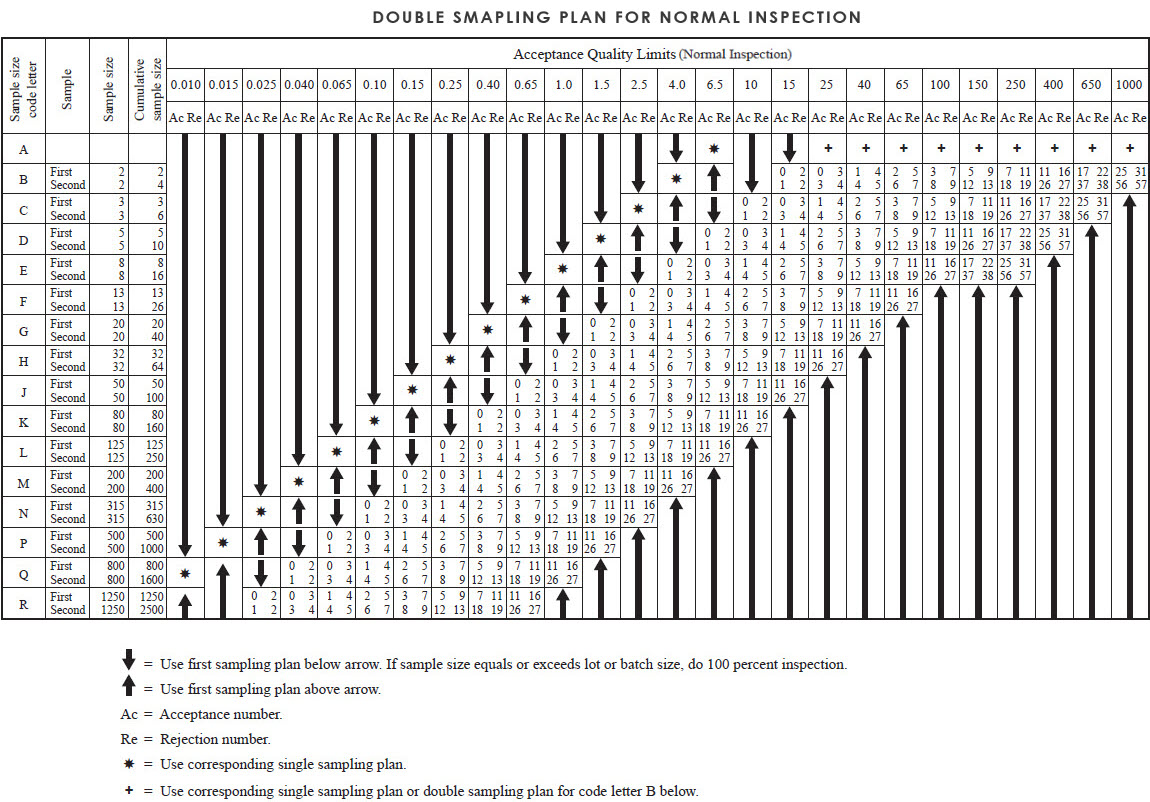
A sampling plan indicates the number of units of product from each lot or batch which are to be inspected (sample size or series of sample sizes) and the criteria for determining the acceptability of the lot or batch (acceptance and rejection numbers). The sampling plan can be single sampling or double sampling for normal inspection, reduce inspection or tightened inspection, for more details please refer to “Switch rules”. The sampling plan widely used by the third-party inspection companies is “Single sampling plan for normal inspection” or “Double sampling plan for normal inspection”.
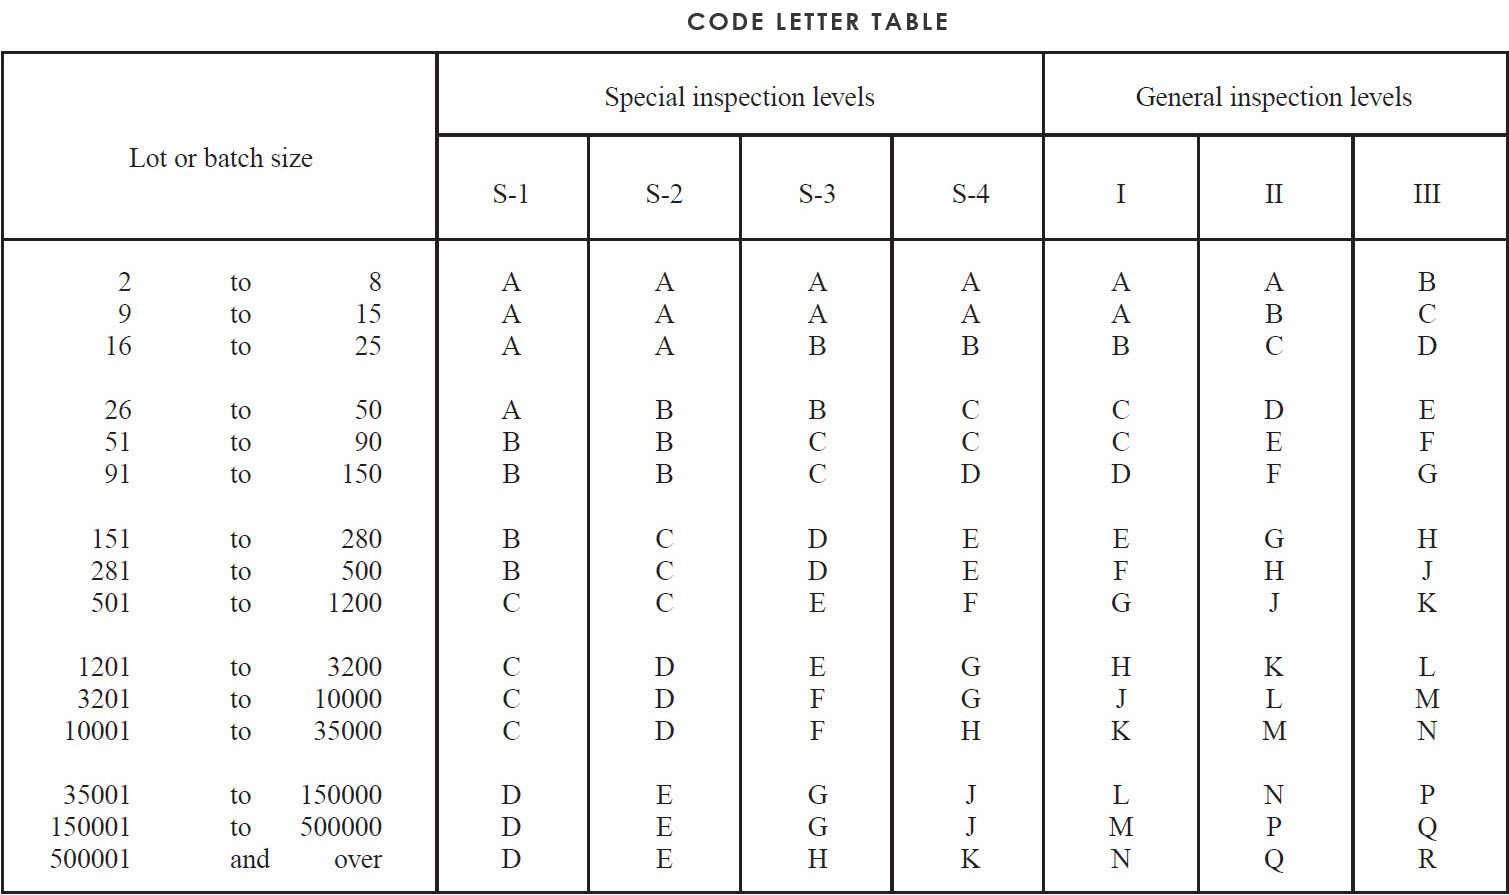
The inspection level determines the relationship between the lot or batch size and the sample size. The inspection level to be used for any particular requirement will be prescribed by the responsible authority. Three inspection levels: I, II and III are given “Code letter table” for general use. Unless otherwise specified. Inspection Level II will be used. However. Inspection Level I may be specified when less discrimination is needed, or Level III may be specified for greater discrimination. Four additional special levels: S-l, S-2, S-3, and S-4, are given in the same table and may be used where relatively small sample sizes are necessary and large sampling risks can or must be tolerated.
Sample sizes are designated by code letters. “Code letter table” shall be used to find the applicable code letter for the particular lot or batch size and the prescribed inspection level.
The AQL and die code letter shall be used to obtain the sampling plan from sampling table. When no sampling plan is available for a given combination of AQL and code letter, die tables direct the user to a different letter. The sample size to be used is given by the new code letter, not by the original letter. If this procedure leads to different sample sizes for different classes of nonconformities, the code letter corresponding to die largest sample size derived may be used for all classes of nonconformities when designated or approved by the responsible authority. As an alternative to a single sampling plan with an acceptance number of 0. the plan with an acceptance number of 1 with its correspondingly larger sample size for a designated AQL (where available), may be used when designated or approved by die responsible authority. Unless otherwise specified by the client, AQL normally used will be “0” for critical, “2.5” for Major and “4.0” for Minor.
DEFECT CLASSIFICATION
A defect is a type of nonconformity. It occurs when a product fails to meet specified or intended use requirements. A defective is a unit of product which contains one or more defects. Failure to meet requirements for quality characteristics are usually described in terms of defects or defectives.
The importance of workmanship defects varies depending on the specific defect size, its position, and the specification. Defects are systematically placed into subcategories to obtain a better insight into the overall quality of workmanship. The subcategories are generally labeled as Critical, Major, Minor, please find their definition below:
Critical defect
Critical defects are those that render the product unsafe or hazardous for the end user or that contravenes mandatory regulations.
Major Defect
Major Defects can result in the product's failure, reducing its marketability, usability or salability.
Minor Defect
Minor defects do not affect the product's marketability or usability, but represent workmanship defects that make the product fall short of defined quality standards.
ON-SITE TEST
On-site test is carried out as per the facility available in the factory, it is not a complete or replacement of laboratory test results. On-site tests results give tentative or approximate idea to customer on the safety, functionality and durability of the product. Customer can have further Laboratory tests for precise findings. The inspection companies refer to test method and acceptance criteria described in the international standards, i.e. EN60335, EN60598, EN50088, EN71, EN581, BS1363, UL153, UL507, UL1278, UL1598, ASTM F963, BIFMA, ISTA, etc.
e.g. 1: On-site tests included for an inspection of rice cooker
- Hi-pot test
- Ground continuity test
- Power cord strain relief test
- Current leakage test
- Power consumption test
- Real function test
- Thermostat test
- Thermal fuse test
- Stability test
- Endurance test
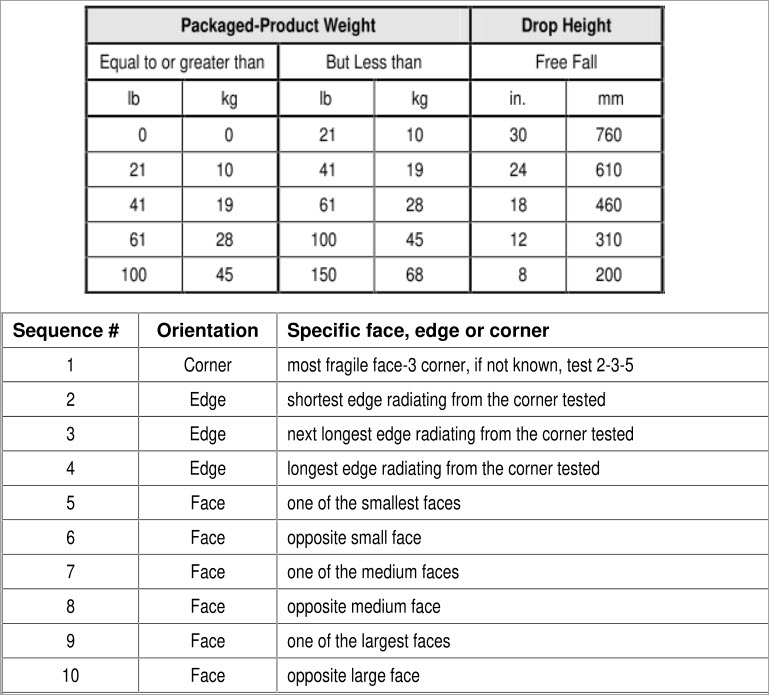
- Carton drop test
- Rub test on rating label
e.g. 2: The test method for carton drop test based on ISTA-1A standard:
ISO9001
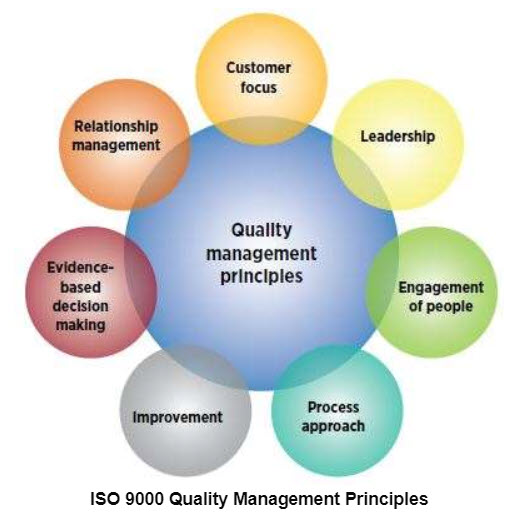
ISO 9001 is a set of international standards for quality management and quality assurance developed to help companies effectively document the quality system elements to be implemented to maintain an efficient quality system. They are not specific to any one industry and can be applied to organizations of any size.
What topics does ISO 9001:2015 cover?
ISO 9001 is based on the plan-do-check-act methodology and provides a process-oriented approach to documenting and reviewing the structure, responsibilities, and procedures required to achieve effective quality management in an organization. Specific sections of the standard contain information on many topics, such as:
- Requirements for a QMS, including documented information, planning and determining process interactions
- Responsibilities of management
- Management of resources, including human resources and an organization’s work environment
- Product realization, including the steps from design to delivery
- Measurement, analysis, and improvement of the QMS through activities like internal audits and corrective and preventive action
What are the benefits of ISO 9001?
ISO 9001 helps organizations ensure their customers consistently receive high quality products and services, which in turn brings many benefits, including satisfied customers, management, and employees. Because ISO 9001 specifies the requirements for an effective quality management system, organizations find that using the standard helps them:
- Organize a QMS
- Create satisfied customers, management, and employees
- Continually improve their processes
- Save costs
ISO14000
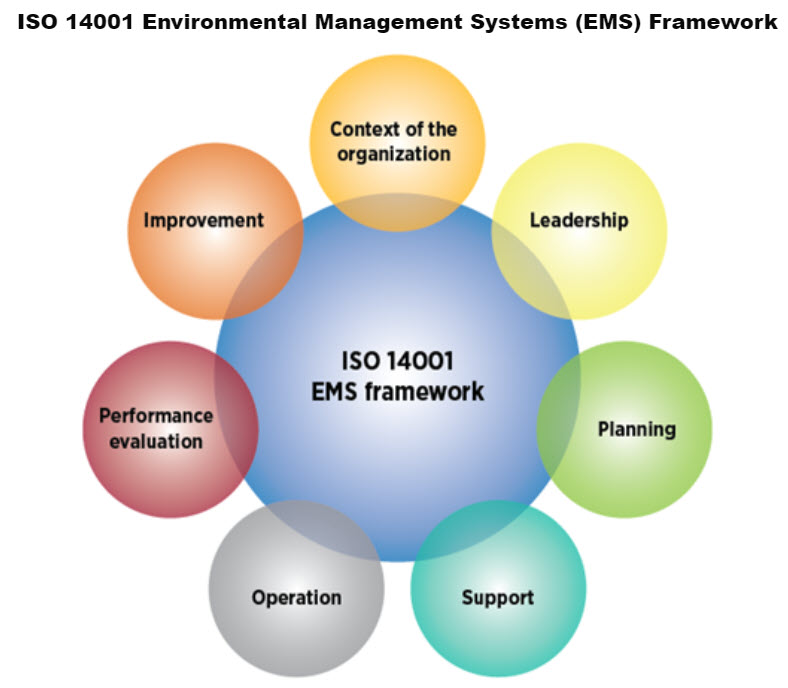
ISO 14001:2015 is a standard of requirements which clearly defines and establishes controls to reduce environmental impact as a result of everyday operations.
What topics does ISO 14001:2015 cover?
At the highest level, ISO 14001:2015 covers the following topics with regard to environmental management systems:
- Context of the organization
- Leadership
- Planning
- Support
- Operation
- Performance evaluation
- Improvement
What are the benefits of ISO 14001:2015?
Organizations and companies find that using the standard helps them:
- Improve resource efficiency
- Reduce waste
- Drive down costs
- Provide assurance that environmental impact is being measured
- Gain competitive advantage in supply chain design
- Increase new business opportunities
- Meet legal obligations
- Increase stakeholder and customer trust
- Improve overall environmental impact
- Manage environmental obligations with consistency
SA8000
SA8000:2015 is a set of tools that helps organizations continuously measure and improve their management system for social compliance, it is to provide an auditable, voluntary standard, based on the UN Declaration of Human Rights, ILO and other international human rights and labor norms and national labor laws, to empower and protect all personnel within an organization's control and influence who provide products or services for that organization, including personnel employed by the organization itself and by its suppliers, sub-contractors, sub-suppliers and home workers. It is intended that an organization shall comply with this Standard through an appropriate and effective Management System.
What topics does SA8000:2015 cover?
At the highest level, SA8000:2015 covers the following topics with regard to social accountability management systems:
- Child Labor
- Forced or Compulsory Labor
- Health and Safety
- Freedom of Association & Right to Collective Bargaining
- Discrimination
- Disciplinary Practices
- Working Hours
- Remuneration
- Management System
What are the benefits of ISO SA8000:2015?
- Reduce the second-party audit and save costs
- Strictly comply with local laws and regulations
- Build international credibility
- Enable consumers to establish positive emotions about the product
- Enable partners to build long-term confidence in the company